Polishing of Diamonds
- Nabilah Ghani
- Apr 20, 2021
- 8 min read
Polishing is the last process of refining a diamond. However, did you know that polishing technology has remained unchanged? It is known that polishing begins in the 13th century in India. Despite being known, the process was not well documented. Around the late 13th century, the polishing technology has been transferred to Venice by merchants. The method of polishing was documented in detail by Cellini, a well-known sculptor in 1568. The purpose of this article is to explain about the different process of cutting that are involved before polishing and how different diamond plane shape affect its polishing direction.
Image Courtesy: Langantiques Image Courtesy: Langantiques
Pre-polishing process
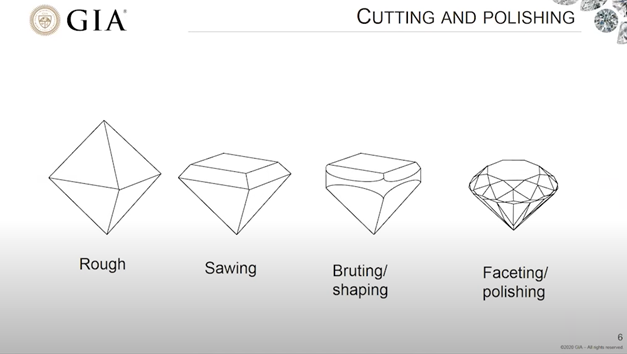
Before a diamond gets polished, it has to go through a planning process. In planning, the diamond will be evaluated by analysing its size, shape, clarity and crystal direction. In order to maximise its end value and presentation, the finest cut for the diamond will be set. Physical Markings will be made on the workpiece's surface to determine which part needs to be cut before the diamond goes through a cutting process which involves sawing or cleaving. Below is an example of the diagram that shows a rough diamond crystal process before it gets to its last look. The purpose of cutting a rough diamond is to maximise the use of the market value of the rough piece. This market value is according to the well-known 4 Cs: Carat weight, Color, Clarity and Cut.
Image Courtesy: essiluxgroup Image Courtesy: GIA
Sawing technique
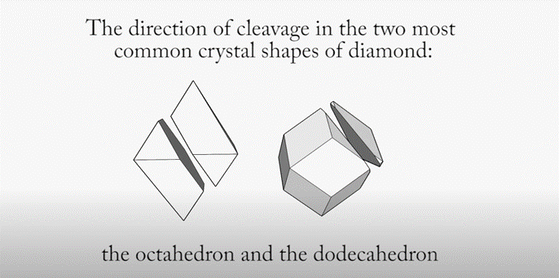
There are two methods that are used to cut a diamond. One is sawing, which was adopted in the middle age as described by De Laet in 1647. Sawing must be performed in certain orientations to the grain, which is known as the two-point plane that is parallel to a dodecahedral face and the four-point plane that is parallel to a cubic face. Sawable rough diamond crystals are usually octahedral or dodecahedral. Unlike cleaving, sawing allows diamonds to be divided along cubic planes known as the octahedral planes and dodecahedral planes.
Image Courtesy: GIA Image Courtesy: Thediamondplanes
Laser sawing vs motorized sawing
The motorized sawing machine was invented in 1900. The disc scaif consists of thin copper or bronze material which is then charged with diamond powder and tiny diamond particle. With the revolutionised laser sawing technology, the laser can saw the diamond in any crystallographic direction. Crystallographic refers to diamond crystal structure. Thus, with laser sawing technology involves, a metal blade is not required to cut a diamond. This process is economically sustainable, as there is not a need to replace any worn-out blade.
Image Courtesy: GIA Image Courtesy: GIA
The laser sawing is a very efficient time-saving machine. For example, a 1.00 carat of a rough diamond crystal can be sawn using the laser saw in about 20 minutes, while mechanical sawing takes a long time, which is about 120 minutes. (Source: GIA) Similarly, both cutting methods lead to the same weight loss. A typical process of laser sawing involves 30 diamonds being lined up in a cassette with a computer, which has been programmed with a special parameter for the sawing process to begin continuously.

Cross-section diagram of how diamond is being laser sawn
Image Courtesy: GIA
Cleaving
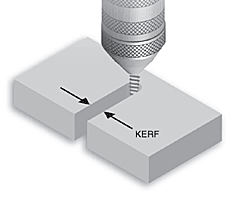
A traditional cutting method such as cleaving is known for dividing a rough diamond into two parts. Rough diamond crystals that require cleaving are often irregularly shaped and need more observation. Two stages are involved in the process of cleaving. One may choose to go for the traditional cleaving method or the modern one, which is known as laser kerfing. Kerf is known as a small V-shaped grooved, which is required to carve into the diamond's surface in a specific direction. The laser Kerf is perceived to be the best tool, as it has a straight-sided groove and narrows with a square bottom base. After going through the kerfing process, the rough diamond will be split with a knife. The cleaver will hit on the blunt blade with the hammer. If the markings and cutting direction are right, the diamond will be divided.

Vargas diamond cleaved into 23 pieces before it was polished.
Image Courtesy: Harry Winston
Laser kerfing vs kerfing
Kerfing is the traditional method of cleaving that requires hand, and it can be a very draining process for the cleaver. First, the cleaver will glue the diamond into a special rod. Afterwards, another sharp edge diamond will be used to scratch against the first piece of the diamond until a groove which is known as the kerf is created. This method requires an extensive amount of time and study before the cleaver could kerf the diamond. Meanwhile, the kerfing technique has been revolutionised to modern laser kerfing, and it is more efficient. First, a special dop is required for a rough diamond to be installed in it. Afterwards, about 20 or more diamonds will be placed in the same cassette. This is to ensure that the line that has been marked in each diamond is aligned and has the same height. The cassette will then be placed into a laser beam. A special pattern is created when the cassette moved along the marked lines, which then creates kerf in each diamond rough. After the kerfing process is done, the diamond will be arranged in a plastic-like material. Once the kerf is prepared, the diamond will be set in a plastic-like material. A small steel blade is placed into the kerf, and the steel blade is struck with a hammer. If the kerf has been located correctly, the diamond will split easily.
Image Courtesy: esabna Image Courtesy: essiluxgroup
Automatic Polishing
An automatic polishing tool was invented in 1997. The machine is capable of finding grain and polishing the direction of a diamond. When using the automatic polishing machine, the diamond needs to be rotated to find a soft polishing direction. The Dialit GS7000 automated polishing machine can polish the crown (excluding the stars) and pavilion facets on a stone. The control panel is on the left. The holder is set in the machine, with a few additional holders in the wooden cassette. The Dialit GSB800 automated blocking machine (right) can block eight facets on the crown or the pavilion. Photos courtesy of Dialit Ltd. (Akiva Caspi,1997)
The Dialit GS7000 automated polishing machine The Dialit GSB800 automated blocking machine
Image Courtesy: GIA
Polishing
The latest polishing process requires a rotating disc scait which is powered at a motor speed of 2400-3000 RPM per minute the cast iron scait is coated with oil and impregnated with diamond powder. In another case, it might be electrochemically bonded with diamond powder at a factory. When the disc scait has worn-out, it will be replaced with a new one. The polisher will hold the black tool known as tang. The diamond will be held by the dop, which is circular in the frontal part of the tang. As depicts in the right picture, the diamond in the jaw-dop can be rotated around the vertical axis to assist the polisher to find the optimal soft direction to polish the facet.
Image Courtesy: GIA Image Courtesy: costerdiamonds
Polishing by abrasion
Two different polishing techniques involve abrasion. They are known as the two-body wear process and three-body wear process. The two-body wear process usually requires hard abrasive material to polish the diamond. The tiny particles that are broken into pieces will smoothen the surface of the workpiece. The three-body wear process involves hard and abrasive particles like diamonds with substrate disc material. Most of the time, the abrasive particles will do the work of polishing the surface.
two-body wear process three-body wear process
Below is an image of the substrate being embedded with diamonds particle. This is also known as the three-body wear polishing process. There is a myth saying that usually there will be diamond dust particle being to waste while that is the phase transition of carbon graphite. Thus, there is no diamond dust particle being produced in the three-body wear polishing process.

Image Courtesy: GIA
Polishing direction
The polishing direction of a diamond is important, as diamond has "hard" and "soft" polishing directions. It is the same analogy as to how wood has grains in it and it can only be cut at a certain angle or direction. As shown in the diagram below, the green arrow indicates the moving direction of the disc scaif which is rotating towards the left direction while the black long arrow found in the middle of the workpiece is the soft polishing direction. If the polisher were to polish the diamond in the hard direction, it will cause damage to the surface of the disc scaif and the polishing result of the facets will be poor. Aligning the workpiece to the soft polishing direction is advised as it will increase the wear rate of a diamond resulting in a better quality of polished facet.

Image Courtesy: GIA
Wear anisotropy & Directional hardness
The wear anisotropy of a facet shows the graph rate of each facet when it gets polished. The red-lined dodecahedral facet is polished in the longitudinal black arrow direction, which is in the soft direction. As shown in the graph, there is an increase in the wear rate. The cubic plane surface has four increase peaks showing, which means it has four good polishing direction. However, when the cubic plane is being rotated, the polishing rate drops causing it to be in the hard polishing direction. The octahedral plane has a low polishing rate. Typically, people avoid polishing on an octahedral plane as the quality of polishing is very low. However, it still has a reasonable polishing direction. The cause of the hard polishing direction is because of the crystal lattice within these 3 planes. The way the geometry of the molecular bond in the crystal lattice has a tremendous impact on the way it is polished.
Image Courtesy: GIA
Round brilliant cut diamond polishing sequence
Round brilliant-cut stones are typically polished in the following sequence:
1) Polishing of The table facet 2.
2) The eight main facets on the pavilion
3) The eight main facets on the crown
4) The eight star facets on the upper crown
5) The 16 upper-girdle (top-half) facets on the crown
6) The 16 lower-girdle (bottom-half) facets on the pavilion
(Akiva Caspi,1997)
Manual polishing facets Automatic polishing facets
Image Courtesy: GIA Image Courtesy: GIA
Polishing of diamond using the manual method requires the polisher to polish the main eight pavilion facets which will then followed by the 16 lower girdle half facets on the pavilion. With automatic polishing, it requires reverse sequence which is the polishing of 16 lower girdle half facets of the pavilion and polishing of the eight main pavilion facets comes afterwards.
This diagram shows how a diamond is set in a holder

Image Courtesy: GIA
Contact pressure
The red arrow is showing the weight block that is leveraging the tang. The purpose of putting the weight block is to reduce contact pressure being put on the diamond being polished because if there is high pressure it can cause the diamond to crack. For example, when a green diamond is being polished, it has to be under control, as if it is heated up above 400-500 degree celsius it can diminish the colour and turn the green-coloured diamond into brown. Therefore, the weight block acts as a tool to reduce the contact pressure of the workpiece when a diamond is being polished.

Image Courtesy: GIA
Sources :


